Sunday, January 30, 2011

Development of a MVC3 Application -- 3 -- Membership Provider Issues for SqlCE

For the MVC3 application we built in Previous Article, as we want our application to be portable and use sdf file as the database for log in as well, we changed the web.config file below:

< add name="ApplicationServices"
connectionString="data source=|DataDirectory|aspnetdb.sdf"
providerName="System.Data.SqlServerCe.4.0" />

See the picture:


There is register and login issues.

Let's goes to the Logon and register page: http://localhost:1414/Account/Register.


When we click "Register", there comes out an exception in AccountModel class:


So what causes this problem? Let's exam the web.config file, and we find the issue:

We will see the memebership provider, profile provider, and rolemanager provider use AspNetSqlMembershipProvider, AspNetSqlProfileProvider and AspNetSqlRoleProvider respectively, and this causes the connection exception.

Instead of re write our own membershipProvider, profileprovider and rolemanagerprovider, we found there have already exists some projects in Codeplex on sql compact asp.net membership provider, so we use the classes directly.

I am not going to write in details, but just follow the instructions in codeplex step by step.

And the Register and login work sucessfully.


You can download my sample code here.

Saturday, January 29, 2011

Development of a MVC3 Application -- 2 -- Entity Framework

In the previous article, we introduced something about Sql CE, currently we used Sql CE4.

Here we create an unit test for the Sql CE connection:

using System;
using Microsoft.VisualStudio.TestTools.UnitTesting;
using System.Data.SqlServerCe;


namespace TestConnection
{
public class Connection
{
public static string conStatus;

public static string GetConStatus()
{
string connString = @"data source=C:\Test.sdf;password=111111";

SqlCeConnection connection = new SqlCeConnection(connString);
//SqlCeEngine engine = new SqlCeEngine(connString);
//engine.Upgrade();
try
{
connection.Open();
conStatus = "Con Opened";
}
catch(Exception e)
{
conStatus = e.Message;
}

return conStatus;
}
}


[TestClass]
public class UnitTest1
{
[TestMethod]
public void TestMethod1()
{

string conStatus = Connection.GetConStatus();

string conStatusExpected = "Con Opened";

//Assert.Inconclusive(conStatus);

Assert.AreEqual(conStatus, conStatusExpected);

}
}
}

Notice that some Sql CE database it may has different version, for example we use Sql Management Studio create a 3.5 version, we may need to use the code below to upgrade:

SqlCeEngine engine = new SqlCeEngine(connString);
engine.Upgrade();

In this article, we are going to use Microsoft ADO.NET Entity Framework Feature Community Technology Preview 5 for database manipulation.

Some of the tutorial of EF CPT5 may be useful:

http://blogs.msdn.com/b/adonet/archive/2010/12/14/ef-feature-ctp5-released.aspx
http://blogs.msdn.com/b/adonet/

In One of my old articles, I write some notes on how to use DataContext object in Linq to Create Database, manipulate tables.

Here EF CPT5 is a wonderful technique which get the manipulation of database easier.
There are numerous articles on use DbContext to create or maniplate the databases.

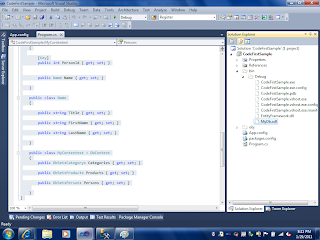
I just wrote some sample code below, notice about how to write the class like Category, Product, Person please check the articles related to POCO.

using System;
using System.Collections.Generic;
using System.Linq;
using System.Text;
using System.Data.Entity;
using System.ComponentModel.DataAnnotations;

namespace CodeFirstSample
{
class Program
{
static void Main(string[] args)
{

using (var db = new MyContentext())
{

//var cate = new Category { CategoryId = "Drinks", Name = "Drinks" };

//db.Categories.Add(cate);

var person = new Person { PersonId = 1, Name = new Name { Title = "A", FirstName = "Tom", LastName = "Cat" } };

db.Persons.Add(person);

int recordsAffected = db.SaveChanges();

Console.WriteLine(
"Saved {0} entities to the database, press andy key to exit",

recordsAffected
);


Console.ReadKey();


}
}
}


public class Category
{

public string CategoryId { get; set; }

public string Name { get; set; }

public virtual ICollection Products { get; set; }

}

public class Product
{

public int ProductId { get; set; }

public string Name { get; set; }

public string CategoryId { get; set; }

public virtual Category Cagtegory { get; set; }

}

public class Person
{

[Key]
public int PersonId { get; set; }


public Name Name { get; set; }

}

public class Name
{

public string Title { get; set; }

public string FirstName { get; set; }

public string LastName { get; set; }

}

public class MyContentext : DbContext
{
public DbSet Categories { get; set; }

public DbSet Products { get; set; }

public DbSet Persons { get; set; }

}
}


When the above code run at the first time, There will have a ProjectName.MyContext database created on the sql express server : localhost\SQLEXPRESS with the tables Categories, Products and Persons. Please follow this link as a first walkthrough.
And
this article talks about the keys for the tables. And msdn has detailful annotation of the attribute which will define the table columns data types. And this article talks about using Fuent API doing some operations such as primary key, composite keys et al.

I am not going to talk about this indetails. But just one thing, Let's right click our project, and add an App.config file.

Change our app.config file to add connection strings:

< add name="MyContentext"
connectionString="data source=|DataDirectory|MyDb.sdf;password=1111"
providerName="System.Data.SqlServerCe.4.0" />

See the picture below:


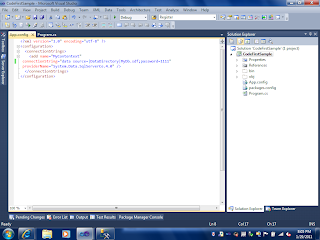
Notice that in the connectionstring setting, the add name="...", the value should be the same as our DbContext class Name.

Run the application, now there will have a SqlCE database, MyDB.sdf with the openning password 1111 in our solution bin folder. See the picture below:


Now let's return to our MVC3 project:

In Visual Studio, View->Other Windows->Package Manager Console


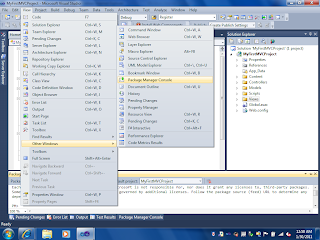
Let's type: install-package EFCodeFirst, this is the same as reference the dll: EntityFramework.


In the Models folder, add a code file and let's write the POCO model classes and DbContext class:

The code is pretty much the following:

using System.ComponentModel.DataAnnotations;
using System.Data.Entity;

namespace MyFirstMVCProject.Models
{
public class Product
{
[Key]
public int ProductID { get; set; }

[StringLength(400)]
public string ProductName { get; set; }

[StringLength(400)]
public string Category { get; set; }

}

public class MyDbContext : DbContext
{

public DbSet Products { get; set; }

}

}

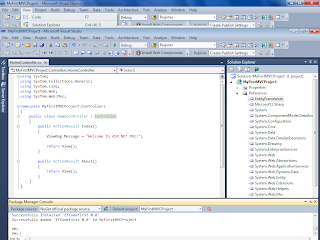
And in the Controller folder, let's add Products Controller:

using System.Linq;
using System.Web.Mvc;
using MyFirstMVCProject.Models;

namespace MyFirstMVCProject.Controllers
{
public class ProductsController : Controller
{
//
// GET: /Products/

MyDbContext mydb = new MyDbContext();

public ActionResult Display()
{
var products = from d in mydb.Products
select d;

return View(products.ToList());
}

}
}

And Let's create a view in shared folder:


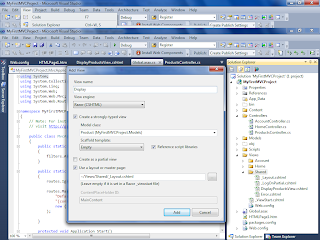
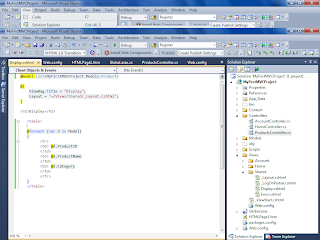
And let's add the code in Display.cshtml file:


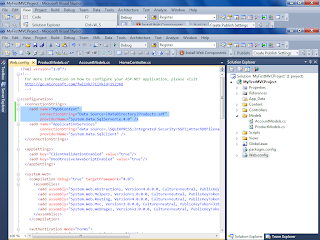
Now in web.config, let's add the following ConnectionString:

< add name="MyDbContext"
connectionString="Data Source=|DataDirectory|Products.sdf"
providerName="System.Data.SqlServerCe.4.0" />

Like the following picture:


Now Let's compile and run our project. We will see there is Products.sdf file under App_Data folder. This database is created in the controller when MyDbContext is called. This is really wonderful, right?


Let's include Products.sdf file in the project.

Let's double click Products database, and Tables for the Products Table->Show Table Data.


Let's add some records in Products table:


Compile and run our site again.

From the Global.asax file, we can see the default route setting is "{controller}/{action}/{id}", so we goes to the http://localhost:1414/Products/Display, we see the picture below:


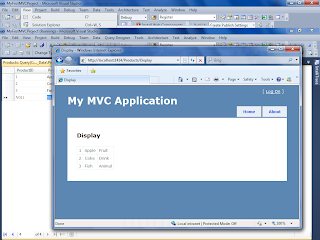
Here we build a basic MVC3 site use EF CTP5.

Development of a MVC3 Application -- 1 --Sql CE

Here we are going to build a MVC3 project. Visual Studio 2010 only has MVC 2 project template. In order to use MVC3 we need to download it from Web Platform Installer, and install the MVC3 from it.


We are going to use SqlCE as the database for this MVC3 demo application.

What is SqlCE?


SqlCE is a portable database engine which doesn't require installation.

See Scottgu's blog:

http://weblogs.asp.net/scottgu/archive/2011/01/11/vs-2010-sp1-and-sql-ce.aspx

VS2010 SP1(Beta) has the brought the visual studio 2010 some of the new features, such as: IIS express.

After the SP1 installed, we need to install the Sql CE tool for Visual Studio so that visual studio support the Sql CE development.

Now let's create a MVC3 project:


And let's select the internet application. And let's choose the view engine to be Razor.


What is Razor?


We can use the default view engine as aspx(support aspx, ascx, master page et al). About the Razor, Scottgu has an article introducing the new view engine Razor. Basically Razor view engine creates the views with extension of .cshtml. CSHTML uses html and C# code (use @ to determine whether it is a C# code). The advatange of this is has visual studio intellisense support and unittestable.

Right click the App_Data and add new item, we can choose "Sql Server Compact 4 local..." then add a Sql CE database, forexample MyDatabase.sdf.


And then we can use Linq to entity operations to manipulate this database. See Scottgu's blog, Walkthrough1, this is very straightforward, and I am not going to write more in details.

Sql server management studio can also create Sql CE database. use the create new database, I am not going to talk it in details. As create sdf file is not our focus in my this series of articles.

Let's compile and run our web application, see the picture below. We create our first MVC3 application.

Thursday, January 20, 2011

Do Not use using statement to close WCF connections

Here are good articles:

http://msdn.microsoft.com/en-us/library/aa355056.aspx
http://codeguru.earthweb.com/csharp/.net/net_general/tipstricks/article.php/c15941/

When call WCF client, this block of code has problem:

using (MyWcfClient myclient = new MyWcfClient())
{
myclient.MyFunction();
}

the reason is after finish the using block, ClientBase.Close() method is forcedly called. There may comes out network connection exception.

The proper code can be:

MyWcfClient myclient = new MyWcfClient();
myclient.MyFunction();
try
{
if (myclient.State != System.ServiceModel.CommunicationState.Faulted)
{
myclient.Close();
}
}
catch (Exception ex)
{
myclient.Abort();
}

or we can simplify the code to be:
MyWcfClient myclient = new MyWcfClient();
try
{ myclient.MyFunction();
myclient.Close();
}
catch
{
myclient.Abort();
}

In this case we can close wcf connection properly.

Note: someone argued this is one of Microsoft bug, but when we close wcf client, we should take notice of this.

New notes in 2011:

As the above code doesn't follow FxCop, the service client is not always been disposed, we can write this code as:

MyWcfClient myclient = new MyWcfClient();
try
{ myclient.MyFunction();
}
catch
{
myclient.Abort();
}
finally
{
myclient.Close();
}

Wednesday, January 19, 2011

Silverlight/WinForm/WPF multi-threading updates the value in UI Controls

Because of thread safety, this block of code below will come out exception when updating the UI thread control values:

private void btn_Click(object sender, EventArgs e)
{
Thread t = new Thread(new ParameterizedThreadStart(MyFunc));
t.Start("Hello World");
}


void MyFunc(object obj)
{
this.textBox1.Text = obj.ToString();
}

The reason is because of thread safety, the UI thread doesn't allow cross thread call by default.

The way to solve this:

1. Set Control CheckForIllegalCrossThreadCalls to be false (not recommend)

public partial class Form1 : Form
{

public Form1()
{
InitializeComponent();
Control.CheckForIllegalCrossThreadCalls = false;
}

private void btn_Click(object sender, EventArgs e)
{
Thread t = new Thread(new ParameterizedThreadStart(MyFunc));
t.Start("Hello World");
}


void MyFunc(object obj)
{
this.textBox1.Text = obj.ToString();
}
}

2. Use Delegate in WinForm


public partial class Form1 : Form
{

Delegate void Del(object obj);
public Form1()
{
InitializeComponent();
}

private void btn_Click(object sender, EventArgs e)
{
Thread t = new Thread(new ParameterizedThreadStart(MyFunc));
t.Start("Hello World");
}


void MyFunc(object obj)
{
Del del = new Del(MyFuncSetValue);
textBox1.Invoke(del,obj);
}

void MyFuncSetValue(object obj)
{
this.textBox1.Text = obj.ToString();
}
}

3. Use SynchronizationContext

see my post article:

http://jiezhu0815.blogspot.com/2009/02/about-synchronizationcontext.html

4. Use BackgroundWorker

See my post article:

http://jiezhu0815.blogspot.com/2010/11/use-backgroundworker.html
http://jiezhu0815.blogspot.com/2010/11/use-backgroundworker-2.html
http://jiezhu0815.blogspot.com/2010/11/use-backgroundworker-3.html

5 Use Control.BeginInvoke (in WinForm) or Dispatcher.BeginInvoke (in SilverLight or WPF)


public partial class Form1 : Form
{

public Form1()
{
InitializeComponent();
}

private void btn_Click(object sender, EventArgs e)
{
Thread t = new Thread(new ParameterizedThreadStart(MyFunc));
t.Start("Hello World");
}


void MyFunc(object obj)
{
this.Dispatcher.BeginInvoke(Action(() => { this.txt.Text = text.ToString(); }));
}
}

Exchange two integer variables without using a temp variable

use the ^ operator which computes the bitwise exclusive (1^0 //1, 1^1//0, 0^0 //0, 0^1//1)

for instance:

int i=5;
int j=3;

We use:

i=i^j;
j=i^j;
i=i^j;

now i and j vablues are exchanged.

Because ^ operator matches the distributive law:
that is a ^ b=b^a

we can see:
i=i^j;
j=i^j^j=j^j^i=0^i=i;
i=i^j^i=i^i^j=0^j=j;

Another way is use the mathematic:

a=a+b;
b=a-b;
a=a-b;

Tuesday, January 4, 2011

Unity Study Notes (4)

In this article we are going to talk about Lifetime managers.

The method of RegisterType and RegisterInstance can have another parameter to specify the lifetime managers.

For example:

container.RegisterType< IWriteService, WriteService>("Write", new ContainerControlledLifetimeManager());

container.RegisterInstance< IWriteService>(new WriteService(), new ExternallyControlledLifetimeManager());

In this case we can specify the lifetime manager.

The lifetime manager can also be specified in configure file:

< type type="MyUnityTest.IWriteService, MyUnityTest"
mapTo="MyUnityTest.WriteService, MyUnityTest" >
< lifetime type="Microsoft.Practices.Unity.ContainerControlledLifetimeManager, Microsoft.Practices.Unity" />
< /type>

Sometimes we can use alias, the configure file can be like:

< ?xml version="1.0" encoding="utf-8" ?>
< configuration>
< configSections>
< section name="unity" type="Microsoft.Practices.Unity.Configuration.UnityConfigurationSection,
Microsoft.Practices.Unity.Configuration" />
< /configSections>
< unity>
< typeAliases>
< typeAliase alias="singleton" type="Microsoft.Practices.Unity.ContainerControlledLifetimeManager, Microsoft.Practices.Unity"/>
< /typeAliases>
< containers>
< container name="myContainer">
< types>
< type type="MyUnityPractice.IWriteService,MyUnityPractice" name="FirstWrite"
mapTo="MyUnityPractice.FirstWriteService,MyUnityPractice" >
< lifetime type="singleton" />
< /type>
< type type="MyUnityPractice.IWriteService,MyUnityPractice" name="SecondWrite"
mapTo="MyUnityPractice.SecondWriteService,MyUnityPractice" />
< type type="MyUnityPractice.PrintBaseClass,MyUnityPractice"
mapTo="MyUnityPractice.PrintService,MyUnityPractice" />
< /types>
< /container>
< /containers>
< /unity>
< /configuration>

By default, if register the type/instance doesn't specify the LifetimeManager, it is TransientLifetimeManager. Which means every time call the Resolve or ResolveAll method, it returns a new instances.

We can also specify the LifetimeManager to be:

ContainerControlledLifetimeManager - the instance will be singleton

PerResolveLifetimeManager - similar to TransientLifetimeManager

PerThreadLifetimeManager - create instance for every thread

ExternallyControlledLifetimeManager - this is similar to singleton, but the instance is weak referenced.

About what is weak referenced and strong referenced, there are links:
http://dotnetslackers.com/Community/blogs/haissam/archive/2008/01/03/weak-references-in-net-c.aspx
And this link has some good explanations:
http://www.dotnetfunda.com/articles/article983-gc-algorithm-and-story-of-weakreference-.aspx

Monday, January 3, 2011

Unity Study Notes (3)

In this article, we are going to talk using Configure file to do type mapping instead of writing code to register type mapping.

Notice, for the code in Unity Study Notes(1) and Unity Study Note(2), we just need to reference the Microsoft.Practices.Unity.dll and using Microsoft.Practices.Unity namespace, when we use configuration file, we need to add one more dll:Microsoft.Practices.Unity.Configuration.dll and using Microsoft.Practices.Unity.Configuration namespace. And also ConfigurationManager class comes from System.Configuration namespace, so we should also reference System.Configuration.dll and include using System.Configuration.

The same thing, we write the IWriteService interface and FirstWriteService, SecondWriteService Classes, We also write the PrintServiceBaseClass and PrintService Class.

public interface IWriteService
{
void Write(string msg);
}

public class FirstWriteService : IWriteService
{
public void Write(string msg)
{
Console.WriteLine("First Write Service: " + msg);
}
}

public class SecondWriteService : IWriteService
{
public void Write(string msg)
{
Console.WriteLine("Second Write Servive: " + msg);
}
}

public abstract class PrintBaseClass
{
public abstract void Print(string msg);
}

public class PrintService : PrintBaseClass
{
public override void Print(string msg)
{
Console.WriteLine("Print Service: " + msg);
}
}

Now let's add a configuration file for mappings.

< ?xml version="1.0" encoding="utf-8" ?>
< configuration>
< configSections>
< section name="unity" type="Microsoft.Practices.Unity.Configuration.UnityConfigurationSection,
Microsoft.Practices.Unity.Configuration" />
< /configSections>
< unity>
< containers>
< container name="myContainer">
< types>
< type type="MyUnityPractice.IWriteService,MyUnityPractice" name="FirstWrite"
mapTo="MyUnityPractice.FirstWriteService,MyUnityPractice" />
< type type="MyUnityPractice.IWriteService,MyUnityPractice" name="SecondWrite"
mapTo="MyUnityPractice.SecondWriteService,MyUnityPractice" />
< type type="MyUnityPractice.PrintBaseClass,MyUnityPractice"
mapTo="MyUnityPractice.PrintService,MyUnityPractice" />
< /types>
< /container>
< /containers>
< /unity>
< /configuration>

And in the main Entry we can resolve our types:

IUnityContainer container = new UnityContainer();
UnityConfigurationSection section = (UnityConfigurationSection)ConfigurationManager.GetSection("unity");

section.Configure(container,"myContainer");

IWriteService service1 = container.Resolve("SecondWrite");
service1.Write("Hello 2011");

PrintBaseClass service2 = container.Resolve();
service2.Print("2011");

Notice, in our this example, as there is only one container, we can also don't specify the container name, like:

section.Configure(container);

But sometimes, in the configure file there are more than 1 container, in that case the 2nd parameter should be the container name.

We can also use ResolveAll method to get the IWriteService Collection:

IEnumerable< IWriteService> services = container.ResolveAll< IWriteService>();
foreach (IWriteService service in services)
{
service.Write("Hello");
}

Notice: We can use the following code to load configuration file:

IUnityContainer container = new UnityContainer()
.LoadConfiguration("myContainer");

This code can be used to replace:

IUnityContainer container = new UnityContainer();
UnityConfigurationSection section = (UnityConfigurationSection)ConfigurationManager.GetSection("unity");

And if using this code, we don't need to have System.Configuration namespace.

If the container doesn't have a name and there is only 1 container, that is in the configure file:

< containers>
< container>
....
< /container>
< /containers>

We can also use code like following to configure the container:

IUnityContainer container = new UnityContainer()
.LoadConfiguration();

Normally, when we add a app.config or web.config file, we don't need to worry about the configue file name. But in some cases, developers may have a configure file with different name, for example: other.config, in this case, we need have some code to read the configure file:

using System.Configuration;
var fileMap = new ExeConfigurationFileMap { ExeConfigFilename = "other.config" };
System.Configuration.Configuration configuration =
ConfigurationManager.OpenMappedExeConfiguration(fileMap,
ConfigurationUserLevel.None);
var unitySection = (UnityConfigurationSection)configuration.GetSection("unity");

When specify the type in configuration file, the format of the type is:

< namespace>.< typename>, < assembly>

the assembly can be strong named as well.

The sample code is at this link:

https://docs.google.com/uc?id=0BwzR-spEXHBFOTAyYzcxMDAtYTA3MS00YmU4LWFmYmQtNjM0OGQ4NTRjYzIw&export=download&hl=en

Unity Study Notes (2)

In this article, we are going to the constructor injection , property(setter) injection and Method Injection.

I.Constructor Injection

By the unity documents:
"As an example of constructor injection, if a class that you instantiate using the Resolve method of the Unity container has a constructor that defines one or more dependencies on other classes, the Unity container automatically creates the dependent object instance specified in the parameters of the constructor."

We write sample code as following:

class Program
{
static void Main(string[] args)
{
IUnityContainer container = new UnityContainer();

FirstService serviceInstance1 = container.Resolve< FirstService>();
}
}
public class FirstService
{
public FirstService(SecondService servicea, ThirdService serviceb)
{
servicea.Print("Happy 2011");
serviceb.Write("2011");
}

}

public class SecondService
{
public void Print(string msg)
{
Console.WriteLine("Hello SecondService," + msg);
}
}
public class ThirdService
{
public void Write(string msg)
{
Console.WriteLine("Hello ThirdService,"+msg);
}
}

The same thing, as in Unity Study Notes(1), we can register types for mapping. We write the following code:

class Program
{
static void Main(string[] args)
{
IUnityContainer container = new UnityContainer();
container.RegisterType< IWriteService, FirstService>()
.RegisterType< PrintBaseClass, SecondService>();
MyService myService = container.Resolve();

}
}

public class MyService
{
public MyService(IWriteService service1, PrintBaseClass service2)
{
service1.Write("Hello 2011");
service2.Print("2011");
}
}

public interface IWriteService
{
void Write(string msg);
}

public class FirstService : IWriteService
{
public void Write(string msg)
{
Console.WriteLine("First Service: " +msg);
}
}
public abstract class PrintBaseClass
{
public abstract void Print(string msg);
}

public class SecondService : PrintBaseClass
{
public override void Print(string msg)
{
Console.WriteLine("Second Service: "+msg);
}
}

When a target class contains more than one constructor with the same number of parameters, we should apply InjectionConstructor attribute to the contstructor so that the Unity container knows which constructor the container will use.

We write the sample code below:


class Program
{
static void Main(string[] args)
{
IUnityContainer container = new UnityContainer();

MyService myService = container.Resolve< MyService>();

}
}

public class MyService
{
public MyService(WriteService service)
{
service.Write("Hello 2011");
}

[InjectionConstructor]
public MyService(PrintService service)
{
service.Print("2011");
}
}


public class WriteService
{
public void Write(string msg)
{
Console.WriteLine("We Write: " +msg);
}
}

public class PrintService
{
public void Print(string msg)
{
Console.WriteLine("We Print: "+msg);
}
}

The executing results are like the picture below, we can see the second constructor is called.


II. Property(Setter) Injection

By the unity documents:
"Unity does not automatically set properties as part of creating an instance; you must explicitly configure the container to do so. One way to do this is to apply the Dependency attribute to the property declaration."

We write the sample code below:

class Program
{
static void Main(string[] args)
{
IUnityContainer container = new UnityContainer();

FirstService myService = container.Resolve< FirstService>();

myService.DependentService.Write("2011");

}
}

public class FirstService
{
private SecondService dependentService;

[Dependency]
public SecondService DependentService
{
get { return dependentService; }
set { dependentService = value; }
}

}


public class SecondService
{
public void Write(string msg)
{
Console.WriteLine("We Write: " +msg);
}
}

Notice that if we don't have [Dependency] attribute, there will come out of exception:System.NullReferenceException.

The same thing, we can do register types for mapping:

class Program
{
static void Main(string[] args)
{
IUnityContainer container = new UnityContainer();
container.RegisterType< IWriteService, FirstService>()
.RegisterType< PrintBaseClass, SecondService>();

MyService myService = container.Resolve();
myService.InterfaceObj.Write("Hello 2011");
myService.BaseObj.Print("2011");

}
}

public class MyService
{
private IWriteService interfaceObj;
private PrintBaseClass baseObj;

[Dependency]
public IWriteService InterfaceObj
{
get { return interfaceObj; }
set { interfaceObj = value; }
}

[Dependency]
public PrintBaseClass BaseObj
{
get { return baseObj; }
set { baseObj = value; }
}

}

public interface IWriteService
{
void Write(string msg);
}

public class FirstService : IWriteService
{
public void Write(string msg)
{
Console.WriteLine("First Service: " + msg);
}
}
public abstract class PrintBaseClass
{
public abstract void Print(string msg);
}
public class SecondService : PrintBaseClass
{
public override void Print(string msg)
{
Console.WriteLine("Second Service: "+msg);
}
}

III. Method Injection


The samething, we can do method call injection. You must apply the InjectionMethod attribute in the target class to initiate method call injection.

We write the code below:


using System;
using Microsoft.Practices.Unity;

namespace MethodCallInjectionExample
{
class Program
{
static void Main(string[] args)
{
IUnityContainer container = new UnityContainer();
FirstService service=container.Resolve< FirstService>();
}
}
public class FirstService
{
[InjectionMethod]
public void MyMethod(SecondService serviceb, ThirdService servicec)
{
serviceb.Print("Hello 2011");
servicec.Write("2011");
}
}

public class SecondService
{
public void Print(string msg)
{
Console.WriteLine("Hello SecondService," + msg);
}
}

public class ThirdService
{
public void Write(string msg)
{
Console.WriteLine("Hello ThirdService," + msg);
}
}
}

We can also register the mappings, for example.
public class FirstService
{
[InjectionMethod]
public void MyMethod(IWriteSerivce interfaceObj1, IPrintService interfaceObj2)
{
.....
}
}

public interface IWriteService
{
void Write(sting msg);
}

public class WriteService:IWriteService
{
public void Write(string msg)
{
....;
}
}

And we use RegisterType do the mappings:

IUnityContainer container=new UnityContainer()
.RegisterType()
.Register();

FirstService service=container.Resolve() to resolve and get the instance.

I write the sample code in this link:
https://docs.google.com/uc?id=0BwzR-spEXHBFYTM4Zjc5ZDItMjM5YS00YWUwLTgyMzItNzkzYjMyZDdkZGM3&export=download&hl=en